Introduction
The Atterberg limits tests are a basic measure of the critical water content of a fine-grained soil: its shrinkage limit, plastic limit, and liquid limit. As a dry, clayey soil takes on increasing amounts of water, it undergoes distinct changes in behavior and consistency. Depending on the water content of the soil, it can exist in four states: solid, semi-solid, plastic, and liquid states. In each state, the consistency and behavior of the soil is different and consequently, so are its engineering properties. Thus, the boundary between each state can be defined based on the change in the soil’s behavior. The Atterberg limit can be used to distinguish between silt and clays. These limits were created by Albert Atterberg, a Swedish agriculturist and were later refined by Arthur Casagrande. (http://en.m.wikipedia.com, 2017). Soils when wet retain water and some expand in volume. The amount of expansion is related to the ability of the soil to take in water and its structural make-up (the type of atoms present). These tests are mainly used on clayey or silty soils since they are the soils that expand or shrink due to moisture content. Thus, these tests are used widely in the preliminary stages of designing any structure to ensure that the soil will have the correct amount of shear strength and not too much change in volume.
As a hard, rigid solid in the dry state, soil becomes a crumbly (friable) semisolid when a certain moisture content termed the shrinkage limit is reached. If it is an expansive soil, this soil will also begin to swell in volume as this moisture content is exceeded. Increasing the water content beyond the soil’s plastic limit will transform it into a malleable plastic mass, which causes additional swelling. The soil will remain in this state until its liquid limit is exceeded, which causes it to transform into a viscous liquid that flows when jarred.
The liquid limit, plastic limit, and the plasticity index of soils are used extensively to correlate with engineering behavior such as compressibility, hydraulic conductivity, shrink-swell, and shear strength. Atterberg defined four possible states of consistency for soils: liquid, plastic, semi-solid and solid. The liquid limit divides the plastic and liquid states and is defined as the water content at which the soil flows to close a standard size groove when shaken in a standardized device. At this water content the soil has approximate shear strength of 2.5 kPa. The plastic limit separates plastic and semi-solid states. At water contents below the plastic limit the soil cannot be molded without cracking. Hence, on an arbitrary basis, depending on the moisture content, the behavior of soil can be divided into four basic states—solid, semisolid, plastic, and liquid—as shown below.

Now, let us take them one at a time!
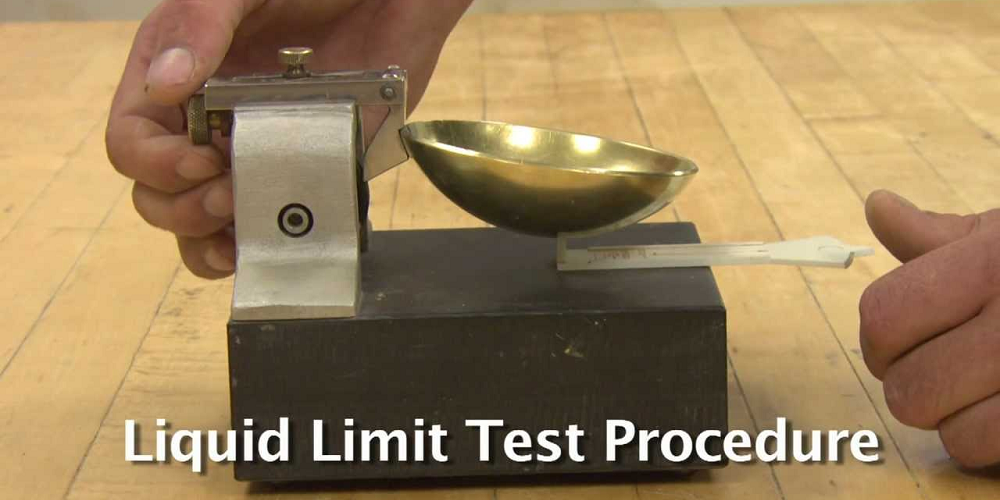
1. LIQUID LIMIT TEST
The liquid limit is defined as the water content at which a standard groove cut in the remolded soil sample by a grooving tool closes over a length of 13 mm (0.5 in) at exactly 25 blows of the liquid limit cup falling from a height of 10 mm on a hard rubber base. It is very difficult to mix the soil at the right water content, even after a number of trials. However, if different trials are plotted on a semi-logarithmic scale they should lie on a straight line and the liquid limit could be taken as the value of water content where the line crosses the 25 blows mark. For this reason, in a liquid limit test we try to mix the soil at least three different water contents aiming at blow counts above and below 25. The schematic diagram of the liquid limit device is shown below.
Objective(s) of the Experiment
This practical is carried out to determine the liquid limit of a fine-grained soil.
Equipments and Materials Needed
- Liquid limit device cup
- Grooving tool
- 200-250 g of soil passing the No. 40 sieve, 425μm aperture size
- Scale with accuracy of 0.001 g
- Water content cup (Know how to find moisture contents here )
- Spatula and mixing tools


Procedures
- Mix the soil thoroughly with enough distilled water to reach a consistency requiring about 25 to 35 blows of the liquid limit device to close the groove. This is about the consistency of creamy peanut butter. Keep in mind that it is easier to add water than to take it away, so try to aim for the “thicker” consistency.

- Using a spatula, place a portion of the prepared soil in the cup of the liquid limit device at the point where the cup rests on the base, squeeze it down, and spread it into the cup to a depth of about 10 mm at its deepest point, tapering to form an approximately horizontal surface. Take care to eliminate air bubbles from the soil pat, but form the pat with as few strokes as possible. Keep the unused soil in the mixing/storage dish. Cover the dish to retain the moisture in the soil.
- Form a groove in the soil pat by drawing the tool, beveled edge forward, through the soil on a line joining the highest point to the lowest point on the rim of the cup. When cutting the groove, hold the grooving tool against the surface of the cup and draw in an arc, maintaining the tool perpendicular to the surface of the cup throughout its movement.

- Verify that no crumbs of soil are present on the base or the underside of the cup. Lift and drop the cup by turning the crank at a rate of approximately 2 drops per second until the two halves of the soil pat come in contact at the bottom of the groove along a distance of 13mm ( 1 2 in).
- Record the number of drops, N, required to close the groove.
- Quickly remove a slice of soil approximately the width of the spatula, along the groove and including the portion of the groove in which the soil flowed together, place in a container of known mass, and obtain the water content. Try to determine water content as soon as possible. The sample is small and looses water quickly through evaporation. (Learn how to find moisture contents here )
- Return the soil remaining in the cup to the mixing cup. Wash and dry the cup and grooving tool and reattach the cup to the carriage in preparation for the next trial.
- Remix the entire soil specimen in the dish adding distilled water to increase the water content of the soil and decrease the number of blows required to close the groove.
- Repeat steps 1-8 for at least two additional trials producing successively lower numbers of blows to close the groove. One of the trials shall be for a closure requiring 25 to 35 blows, one for closure between 20 and 30 blows, and one trial for a closure requiring 15 to 25 blows.
Results and Calculations
- Plot the relationship between the water content, and the corresponding number of drops, N, on the graph provided. Draw the best straight line through the three or more plotted points.
- Take the water content corresponding to the intersection of the line with the 25-drop abscissa as the liquid limit of the soil and round to the nearest whole number.
2. PLASTIC LIMIT TEST
Objective(s) of the Experiment
This practical is carried out to determine the plastic limit of a fine-grained soil sample.
Equipments and Materials Needed
- Ground glass plate
- Metal rod, 3.2 mm diameter
- Weighing Balance
- Water content cup (Know how to find moisture contents here )
Procedures
- Select about 20 g of soil from the material prepared for the liquid limit test.
- Reduce the water content of the soil to a consistency at which it can be rolled without sticking to the hands by spreading or mixing on the glass plate.
- From this plastic limit specimen, select a 1.5 to 2.0 g portion. Form the selected portion into a ball.
- Roll the mass between the palm or fingers and the glass plate to form a thread of uniform diameter throughout its length. Keep rolling until the thread reaches 3.2 mm (1/8 in) diameter.
- Compare to the metal rod to determine if the diameter is 3.2 mm. The process should take no more than 2 minutes for each thread.
- When the thread has reached a 3.2 mm diameter, break it into pieced and knead together in a ball. Repeat the rolling and kneading process until the thread crumbles and the soil can no longer be rolled into a 3.2 mm thread. Do not cheat, be consistent: apply the same rolling pressure during each stage of the rolling and do not pretend to roll while you wait for the soil to dry and crumble. If the soil breaks into threads of shorter length, roll each of these shorter pieces into threads 3.2 mm in diameter and repeat the kneading and rolling process.
- Collect the broken pieces in a water content cup and cover to prevent further drying while rolling the next 1.5-2.0 g of soil.
- Select another 1.5 to 2.0 g portion of soil from the plastic limit specimen and repeat the operations steps 3-6 until the container has at least 6g of soil.
- Use the 6 g of soil to obtain the water content by drying in an oven for 24 hours at a temperature of 105oC – 115oC, and then weigh the dry sample. Determine the water content. (Learn how to find moisture contents here )
- Go through the procedure in steps 1-8 until you have obtained two 6 g samples and water content values. The water contents should not have a difference of more than 1.4%.
- The plastic limit (P.L.) is the average of the two water content values. That is,


3. LINEAR SHRINKAGE TEST
The shrinkage limit (SL) is the water content where further loss of moisture will not result in any more volume reduction. A sample weighing 150g from a thoroughly mixed portion of bulk material passing 425 micron IS sieve is used (www.civilblog.com, 2017).
Objective(s) of the Experiment
This practical is carried out to determine the linear shrinkage of a fine-grained soil sample.
Equipments and Materials Needed
- Soil Sample
- Mould
- Oven
Procedures
- The mould is thoroughly cleaned and a thin film of grease is applied to its inner walls.
- The soil sample is mixed thoroughly with distilled water, using palette knives, until the mixture becomes homogenous.
- The mixed soil-water paste is then placed in the mould such that it is slightly above the sides of the mould.
- Then the mould with the soil paste is dried in the oven maintained at a temperature of 105 to 110 degree Celsius.
- After complete drying, the mould and soil is cooled and the mean length of the soil is measured.
Results and Calculations
The linear shrinkage of the soil is to be calculated as a percentage of the original length of the specimen from the following formula: Linear shrinkage = [1- (Length of oven dried specimen / Initial length of specimen)] x 100. The linear shrinkage of the soil is to be reported to the nearest whole number.
Discussion and Conclusion
From these tests, a very important parameter called Plasticity Index can be calculated, and it gives a lot of information about the soil. It is also used in different soil classification systems.
Plasticity Index
The plasticity index (PI) is a measure of the plasticity of a soil. It is the size of the range of water contents where the soil exhibits plastic properties. The PI is the difference between the liquid limit and the plastic limit. Soils with a high PI tend to be clay, those with a lower PI tend to be silt, and those with a PI of 0 (non-plastic) tend to have little or no clay or silt.
The plasticity index is calculated as follows:
PI = LL − PL
where: LL = liquid limit, PL = plastic limit
Using the Plasticity Index
Burmister (1949) classified the plasticity index in a qualitative manner as follows:

References
- www.civilblog.org
- www.wikipedia.com
- Das, B. M. (2006). Principles of Geotechnical Engineering, 7th ed. Cengage Learning, Stamford.
- Burmistre (1949).

")


