Introduction
Metallography involves the procedures required to view the internal micro structure of a metal. The properties of engineering materials that are in everyday use are dependent on the compositions of the materials that are used in making them. In case of metals, two components may be made out of the same material with the same composition but still have different properties. One other parameter that determines the properties of a component which also depends on composition and or heat treatment is the microstructure developed in the component. The proportions and types of phases, which constitutes the microstructure, formed in a given specimen determines its overall properties and its reliability or otherwise in service. In order to assess the service performance of a component, the microstructure must be examined and documented to ensure that the right phases are developed. Techniques developed in metallography have also been useful in allowing the effects of pressing routes to be assessed in terms of microstructural changes. Though scientific equipment such as microscopes are employed in Metallography, the techniques developed are more of arts than science. Introduction and exposure to these techniques will go a long way in ensuring that metallurgical and Materials Engineers prepare specimens from which the correct deductions can be made .Metallography consists of the following:
Processes Involved in Metallography
- Specimen Preparation
- Cutting or sectioning.
- Mounting
- Grinding (rough or fine).
- Polishing (rough or fine).
- Etching.
- Photomicrography
- Observing under optical microscope.
- Taking pictures.
- Printing of pictures.
Specimen preparation is a very crucial stage in Metallography as employment of wrong method may lead to the destruction of the specimen and this may make correct observations impossible. Metallography as discussed, is the study of the internal structure of metals and alloys with the aid of a microscope. It is the science of preparing, interpreting and analyzing microstructures of materials to better understand the performance and behaviour of materials in service. A very important part of the metallographic process is “a well prepared specimen” and the characteristics of a well specimen include: proper sectioning, mounting, grinding, polishing and also has a surface free of scratches and pits and liquid staining and is also flat enough to be able to be observed under a microscope.
Objective of the Experiment
The experiment is carried out to study, observe, and sketch out the internal structure of metal and alloy specimens.
Equipments Needed
- Mounting Press
- Cutting Machine

- Pedestrian Grinder
- Ecomet Polisher (E.g Alumina)

- Etchant

Procedures
As mentioned in the introduction, in order to achieve a well prepared specimen, the procedures are divided into two broad sections: Specimen Preparation and Photomicrography.
The specimen preparation procedure involves the following steps:
- CUTTING OR SECTIONING: This step is necessary if you have a very large chunk of specimen. The specimen needs to be reduced to a proportion that can easily be handled by the person carrying out the experiment. As the name implies the process involves cutting out a portion of a piece of specimen so that its internal structure can be examined. It’s the very first process in Metallography.
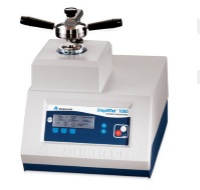
- MOUNTING: The primary aim of mounting a specimen is to make it handy and have a better edge control. If you have a very small Specimen that cannot be handled easily, you get a substance with a see through hollow such as a ring and place the specimen at the middle of the substance in order to carry out mounting. There are two types of mounting, they are hot mounting and cold mounting.
- Hot mounting: This is the process of mounting a material in the presence of heat and pressure. In order to carry out hot mounting, you need an instrument called mounting press. A hot compression thermosetting resin is used to carry out hot mounting because it shrinkage is reduced and a reduced shrinkage allows for better edge retention. The mounting press allows you to be able to control the temperature and pressure so you can be able to change it according to the limit of the specimen. Because heat affects the internal structure of materials, so you need to be able to control heat most importantly.
- Cold Mounting: This is the process of mounting a material using acrylics and epoxy resins. Those are the two types of cold mounting we have. But the epoxy resins are better to use because they have the best shrinkage but the only disadvantage is that they have a very long curing time but the acrylic resins have also limited shrinkage but not as limited as epoxy resins but the only advantage they have on epoxy resin is that they have a very short curing time. So to choose the better resin to use depends on the specimen being worked upon. You choose the resin which the specimen has better retention with.
- GRINDING: This is the process of smoothening and flattening the face of the specimen using a machine called the ‘pedestrian grinder’. The machine employs the use of ‘Silicon Carbide’ as abrasive to grind the surface of a metal. The silicon carbide comes in different grit sizes ranging from 220-800.The lower the number of the paper, the more abrasive the it is, i.e. 220 is the most abrasive, followed by 240, followed by 320, followed by 400, followed by 600 followed by 800. The 800 paper has a very fine surface. You start grinding from the more coarse paper depending on the surface of your specimen and during the process of grinding, you need to provide the paper with a regular supply of water in order to wash off the chips produced during the grinding process in order for them not to scratch the face of the specimen further and also to control the temperature of the specimen because the process of grinding generates heat and heat could distort the structure of the specimen, so heat needs to be controlled. After grinding and achieving a clean surface we can then go on to the process of polishing the surface.
- POLISHING: This is the final stage of the mechanical preparation stage. This is the final process of smoothening the surface using a machine called the ‘the ecomet polisher’. A nap free cloth is placed in conjunction with a lubricating liquid such as alumina is used on the ‘ecomet’ polisher. The specimen is gently placed on the rotating disc of the ecomet polisher for it to polish it and then it is also provided with the regular supply of water for it to wash off the chips produced during the polishing and also the Alumina should be supplied on regular basis to lubricate the surface of the specimen. You must achieve a mirror like surface after polishing the surface, i.e. the surface must be very reflective. After achieving a perfectly reflecting surface, then you can etch the surface of the specimen to get it ready to be observed under the microscope.
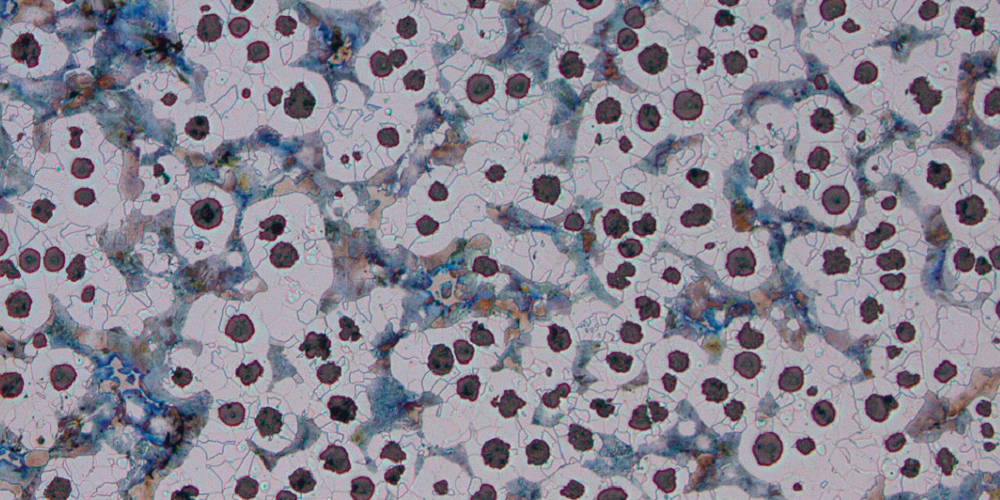
- ETCHING: The purpose of etching is to make visible the internal structure of a specimen because a polished surface cannot reveal the internal structure of the specimen and also to produce an optical contrast between the various constituents of the specimen. The chemical used in making this possible is called an etchant and they are of either organic acids or inorganic acids or alkalis or other complex substances dissolved in solvents such as water or alcohol or glycerine. The specimen is either held with thongs and immersed in the etchant or cleaned gently with a cotton wool. After etching, the specimen should be thoroughly cleaned with water and dried and then placed in a desiccator to prevent scratching and oxidation of the specimen. After etching, we then observe the internal structure of the specimen under a microscope and sketch out the internal structure of the specimens for analysis and report.
Data and Results
- The information on specimens used for the experiment should be tabulated as shown below:

- After observing the specimens under the microscope, the observed internal structure of the specimens should be sketched and attached.
- Discuss on the microstructures of the specimens I relation to their manufacturing histories.
Discussion and Conclusion
After the experiment, it will be observed that differences in the cooling rate appear to provide effects on the micro-hardness of steels, depending on the carbon content of steels. The micro-hardness increases with increase in cooling rate and the carbon content due to solid solution hardening and formation of the ‘martensite’ phase. Thus heat treatment is used to obtain desired properties of steels such as improving the toughness, ductility or removing the residual stresses.


