Introduction
The concrete slump test (just like Compacting Factor Test) measures the consistency of fresh concrete before it sets. It is performed to check the workability (how easily concrete can be placed and compacted) of freshly made concrete, and therefore the ease with which concrete flows. It can also be used as an indicator of an improperly mixed batch. The test is popular due to the simplicity of apparatus used and simple procedure. The slump test is used to ensure uniformity for different loads of concrete under field conditions. This test is used both in the laboratory and in the field for quality control.
Objective(s) of the Experiment
The test is carried out to determine the slump of freshly mixed portland cement concrete, both in the laboratory and in the field.
Equipments Needed
- Mold in the form of lateral surface of frustum with a top diameter of 102 mm (4 in.), bottom diameter of 203 mm (8 in.), and height of 305 mm (12 in.).
- Tamping rod with a length of 0.6 m (24 in.), diameter of 16 mm (5/8 in.), and rounded ends.
Procedures
- Mix concrete either manually or with a mechanical mixer. If a large quantity of mixed concrete exits, obtain a representative sample. To obtain a representative sample, take samples from two or more regular intervals throughout the discharge of the mixer or truck. DO NOT take samples at the beginning or the end of the discharge.
- Dampen inside of cone and place it on a smooth, moist, non-absorbent, level surface large enough to accommodate both the slumped concrete and the slump cone
- Hold the mold firmly in place by standing on the two foot pieces.
- Immediately fill the mold in three layers, each approximately one-third of the volume of the mold. Note that one-third of the volume is equivalent to a depth of 67 mm (2-5/8 in.), whereas two-thirds of the volume is equivalent to 155 mm (6-1/8 in.).
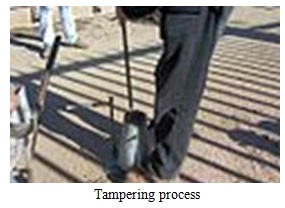
- Rod each layer 25 strokes, using the tamping rod. Uniformly distribute the strokes over the cross section of each layer. Rod the second and top layers each throughout its depth so that the strokes penetrate the underlying layer. In filling and rodding the top layer, heap the concrete above the mold before rodding is started. If the rodding operation results in subsidence of concrete below the top edge of the mold, add additional concrete to keep an excess of concrete above the top of the mold at all times.
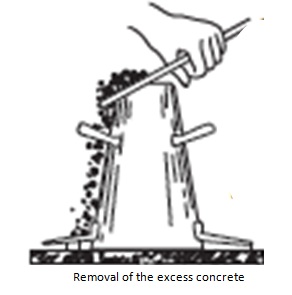
- 6. After the top layer has been rodded, strike off and Remove the excess concrete from the top of the cone, using tamping rod as a screed. Clean overflow from base of cone.
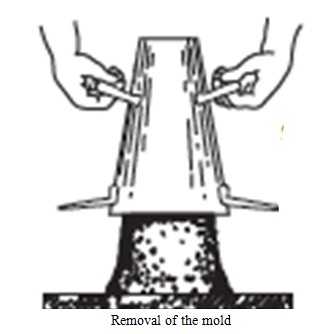
- 7. Remove the mold immediately from the concrete by raising it up carefully without lateral or torsional motion. That is, do not jar the concrete or tilt the cone during this process. The slump test must be completed within 2.5 minutes after taking the sample.
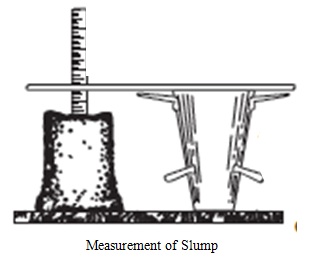
- 8. Measure the slump by determining the vertical difference between the top of the mold and the displaced original center of the top of the specimen, as shown in the figure. If two consecutive tests on a sample of concrete show a falling away or a shearing off of a portion of concrete from the mass of the specimen, the concrete probably lacks the necessary plasticity and cohesiveness for the slump test to be applicable and the test results will not be valid.
Result
The slump value is reported to the nearest 5 mm
Discussion and Conclusion
Interpretation of Results
The slumped concrete takes various shapes and according to the profile of slumped concrete, the slump is termed as true slump, shear slump or collapse slump. If a shear or collapse slump is achieved, a fresh sample should be taken and the test repeated. A collapse slump is an indication that the mix is too wet.
Only a true slump is of any use in the test. A collapse slump will generally mean that the mix is too wet or that it is a high workability mix, for which the slump test is not appropriate. Very dry mixes having slump 0 – 25 mm are typically used in road making, low workability mixes having slump 10 – 40 mm are typically used for foundations with light reinforcement, medium workability mixes with slump 50 – 90 mm, are typically used for normal reinforced concrete placed with vibration, high workability concrete with slump > 100 mm is typically used where reinforcing has tight spacing, and/or the concrete has to flow a great distance.
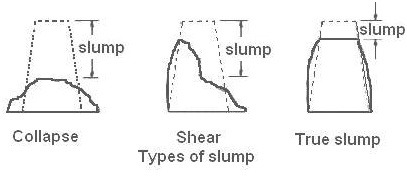
- Collapse: In a collapse slump the concrete collapses completely.
- Shear: In a shear slump the top portion of the concrete shears off and slips sideways.
- True: In a true slump the concrete simply subsides, keeping more or less to shape.
Slump Test's Limitations
It should be noted that it is not favourable to use this test in all cases. These cases include:
- When the concrete is very wet
- When the mix is dry
- When concrete contains aggregates larger than 40mm
References
- Gates Concrete Forming Systems. ‘Slump Test Procedure (Field Testing)’.
- Wikipedia. ‘Concrete slump test’. https://en.wikipedia.org/wiki/Concrete_slump_test. Assessed March 6, 2018.
- Mamlouk, M.S. And Zaniewski J.P. (2011). “Materials For Civil and Construction Engineers”
- CivilBlog. "Different Test Methods for Workability Measurement". http://civilblog.org/category/concrete-technology/
Credits: Samuel Alalade. Obafemi Awolowo University, Ile-Ife, Osun State, Nigeria.
